Sunday, April 25, 2010

Sharing Journals


I spent 2 hours looking for a post I found a few weeks ago about a sharing journal.  Bad news I didn't find it, Good news, I figured out Google Reader!  Are you guys using this??  You can tag different posts in the blogs you follow for later reference.  It's great.  Now all the projects I find that "I have to try" can be organized for use on a later day.  And you know how I am about organizing!!!

Anyway, a few weeks ago, I found a post about a mom and her sharing journals with her kids.  It reminded me of something I did with my best friend in high school.

Basically it is a notebook that you write notes to each other in.  You know how much easier it is to write to each other than talk to each other about certain things.  Now that my daughters are tweens, I worry so much about us not continuing our talks.  Right now, they tell me everything, I want to keep it that way.

So, I made these journals


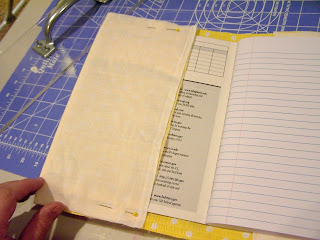
I took $1 composition notebooks and covered them with scrap fabric.

I will post a tutorial at a later date (when my camera gets fixed, these pics are from an old camera and I wasn't sure how they would turn out)

It is very simple I measured the notebook on the fabric and pinned it:


Turn in right side out and accessorize!

I love this one with ruffles


Don't be dumb like me and sew the ruffles on after you have hemmed the edges. 
I sewed it closed and had to pick them off. 

I also love this one, I made felt flowers


I cut them out with my Sissix, which I never thought I'd use again.  But it worked great.  Then I cut the head off some colored pins I have for the centers.  (I didn't have any beads and I'm working on stash busting, no craft store trips)

They turned out great, my girls love them.  Hopefully this keeps us "talking".

Have a great week!


The Girl Creative

Thursday, April 22, 2010

New Friend Friday

This is my favorite linky party because I've actually found lots of friends doing it.  Join the fun

The Girl Creative

Wednesday, April 21, 2010

Guest Blogging Today~

I am guest blogging at Women Who Do It All today!  Yeah me, my first guest post! 
Jill has a great blog full of fun ideas and don't you just love the title?!? 


Click here and see how to make this awesome chore chart!


Monday, April 19, 2010

Hair!

I don't know what the musical Hair is about, but I'm pretty sure it's about 3 pre-teen girls and their mom and all of their hair and how it clogs drains and fills vacuums and how they spend every day trying to figure out some new way to fix that hair so they don't look like a little girl and don't look like a teenager.  No?  Oh...  Well that is certainly the what our house is like. 


This picture is a few years old, back when they let me dress them alike!

Anyway, we struggle with hair styles that are age appropriate.  Some are too little girl and some are too mature for them.  They are growing up to fast as it is, I don't want them looking like teenagers.

So, we've been making hair accessories.


Have you seen these?  They are burnt on the edges and that is what makes them curl up.


Cut a few circles out of silky fabric


Hold the edges ABOVE a flame  It will start on fire, be careful


It will curl the edges.  Make all of them different sizes and stack them together. 


accessorize as desired, and WALA!


We also took a different take on the flower clips.


I took scraps left over from my Easter Carrots and tore it into 1" scraps.  Then braided into two differnet strands


I measured it around my daughter's head and sewed on elastic to make it fit.

I then clipped the stem off of a flower and glued it to a piece of felt.


Glued it to the braids and cute pre-teen headband.  Although I think it would work for just about anyone


I also made a matching bracelet.  Same braiding, I just added rolled fabric.


Glued on felt to hold it, and cut it out.


I glued 3 on the braides.


Matching bracelet. 
Super easy, super cute, super cheap. 
My motto. 

Linking to:


Wednesday, April 14, 2010

Diaper Bag

Stash Busting!~!

I'm hard at work trying to bust some of my stash. (there is the possibility that I'm adding to my stash too, but I won't mention that)

Several years ago, I found this fabric that I love!  Do you remember the blue version from my car seat cover?    I of course bought several yards of it.  (in case of a craft emergency, of course).  My plan was to make a crib bedding set.  But since Cooper was born a boy...

I did make 2 of these diaper bags a few years ago.  I've modified them each time I've made them.  The first one was too soft.  I changed the the interfacing I used, but the second one I thought was too short.  (this is starting to sound like a Goldilocks story!) 

I think this one turned out great.  I did enlarge it from the last two. There are three pockets on the inside. I made the bottom removable so you can wash it after either your spill Cheerios or diaper cream in the bottom. The bottom fabric Velcro’s onto the cardboard and can also be removed and washed.

This fabric was cut out for about 2 years.  I was excited remove it from the list of things to get done.  Now it is moved to the "who do I give this to" list. 

Are you working on your stash?  I have a folding table in my craft room with the current projects I'm working on stacked.  That way, when I have a few minutes to go down there, I have lots of projects to pick from, depending on my mood.

Saturday, April 10, 2010

April Calendar


Calendar


There is an awkward spot on the wall in between my kitchen and family room.  I wanted to put a china hutch of some kind, but I'm afraid it would crowd the room.


So a year or so ago, in a Pottery Barn catalog, I saw this idea.  Of course the PB version was $400, mine cost about $15.


It is a full size wall calendar.  With 4 kids it seems impossible to remember everything (each pregnancy sucked a little more of my brain away).  We use this calendar to post wedding/bday party/shower invitation.  For reoccurring events, such as piano lessons, I laminated a slip of paper and have it always posted.  With my cricut, I made days of the month to match each month.


This calendar helps my kids be able to see what is going on with their lives as well.  Its great for my husband and mom to always be able to know what's going on as well.  We aren't relying on my PDA to help us all keep it together.

Here is how I made it:

At Wal-Mart, I bought the corkboard in squares.   It comes with sticky pads to attach it to the wall.  They don't work very well.  So I bought some 3M sticky pads to attach it.  Then I hot glued white ribbon to create the days of the month.  Walla!  Easy as that.  Plus I think mine turned out cuter than the PB version! 

So, here is the deal.  I have about 6 of the months of the year completed with days of the month cut outs and decorations for the top of the calendar.  The other 6 months, I just use the last month's days.  About 5 days before the beginning of the next month, I'm going to post my calendar.  This will force me to finish each month within the next year.  Plus there are a few months I want to redo because they didn't turn out that cute.


Here is my little helper, each time I get the camera out, he wants his picture taken.  I have a feeling he's the reason my lens is broken at the moment....


I'm working on some STASH BUSTING projects.  Have you guys been following Dollar Store Crafts stash busting month?  I'm inspired to get some of my projects DONE!  Tonight I finished a diaper bag that has been 1/2 done for about 2 years.  I'll post pictures soon. 


How do you keep track of your kids and all that they have going in their lives?  I'd love to hear your ideas~
Have a great rest of your weekend

Wednesday, April 7, 2010

New Blog Design

I'm so excited.  As you can see, we have a new look here at Mommy Time Crafts.  I was able to talk one of my very talented friends into designing a whole new blog for me!  Isn't it awesome?!?

I'm a firm believer in do what you are good at.  One thing I'm good at is taxes, I'm an accountant by trade.  One thing I'm not good at is web design, or any computer design in fact.  So, in an effort to maximize my talents and not try to pick up new hobbies I'll never quite get, I was able to talk Michael at Sabor Designs into designing my blog as I finished his taxes. 

I'm pretty sure I ended up with the better end of the deal.  Thanks again Michael.