Showing posts with label fabric. Show all posts

Thursday, June 3, 2010

4th of July Wreath & Decor

Did you see my guest post over at A Vision to Remember?

In case you missed it, here it is. 
This is what we did at our family craft night a few weeks ago.
(My laptop is in the shop!  All my pics are on it.
I should have it back this weekend and
then all new posts!  Also, I'm working on
a give-a-way as soon as we hit 50 followers!)


4th of July Rag Wreath


I know it's a little early to be working on 4th of July
decorations, every year July rolls around and
I have nothing to put out and no time
to get anything done

Besides, I REALLY want to start Halloween and Christmas crafts,
but it's too early to do that, right???  (maybe next month)


This was a very easy inexpensive project I came up with
for our family craft night.  We try to get together every few
weeks and eat food and craft.


I bought this fabric at Wal-Mart really cheap.  Each wreath was about $6.

If I were to do it again, I would go with more VIVID colors,
although this matches perfectly with my house,
my front door is a burgundy color, and
it doesn't stand out as much as I would like.


Snip your fabric every 1" and rip into strips.

Then cut the strips at 6".  I used about 1 yard
total, from 5 colors, for the wreath. 

Take some wire hangers and bend them round


Tie the strips around the hanger in a single knot.


Squish it together as you go and fluff later. 


This is my first attempt:


I was able to squish the strips together and fit a TON more fabric

Making it a lot FULLER.


I love how it turned out.  It took me about 6 hours because
of all the gabbing and eating.  Probably should have only
been about 1 hour.  But that's what makes
crafting so much fun, right!!!

BUT WAIT....THAT'S NOT ALL
If you do this craft in the next 30 minutes, we'll throw in this
Bonus Craft - Separate Shipping & Handling may apply
(Don't you love those commercials?!?
Even my kids always say "But Wait")

Fire Crackers
for your table


I cut a 2x2 into 4", 6", and 8" lengths

Paint, glue on wick, wrap and you done.

Great kid craft, neighbor gift, anything

My cousin's version:


Aren't they beautiful?  She's way more artistic than me.


Thursday, May 13, 2010

Memory Wristlets


Last weekend we spent our weekend celebrating a mom that left this earth too soon.

We participated in the Race for the Cure Fun Run/5K in support of breast cancer.


I wanted to make something fun to give to all of our friends and family
that joined us on Saturday.  I decided a keychain wristlet was the perfect idea.


I bought this webbing and hardware on Etsy from Patty.  She was
great to work with and got it right out to me.
Look at this fabulous fabric I bought.  I shows support for the cause.
but is a little different that the standard ribbons.


I cut the webbing at 12" and sewed the fabric on top.

Check out this awesome tool I found to fold the fabric over so you can iron it straight.


It worked so great especially since I had a line I had to follow when ironing.

You can also use ribon for this.  It would have saved me some time, but I
couldn't find what I needed.

Sew the fabric/riboon on the webbing and insert in the hardware.


These were SO easy to make and turned out so cute.  I made 30 in about an hour.


We tied them to a bag of cookies that my girls made and added a thank you note.


Cheap and easy Thank You gift!

Join us Saturdays at tatertotsandjello.com for the weekend wrap up party!

Sunday, April 25, 2010

Sharing Journals


I spent 2 hours looking for a post I found a few weeks ago about a sharing journal.  Bad news I didn't find it, Good news, I figured out Google Reader!  Are you guys using this??  You can tag different posts in the blogs you follow for later reference.  It's great.  Now all the projects I find that "I have to try" can be organized for use on a later day.  And you know how I am about organizing!!!

Anyway, a few weeks ago, I found a post about a mom and her sharing journals with her kids.  It reminded me of something I did with my best friend in high school.

Basically it is a notebook that you write notes to each other in.  You know how much easier it is to write to each other than talk to each other about certain things.  Now that my daughters are tweens, I worry so much about us not continuing our talks.  Right now, they tell me everything, I want to keep it that way.

So, I made these journals


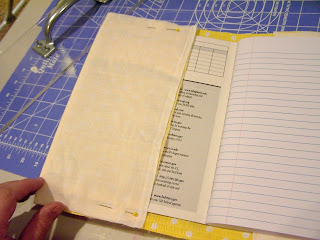
I took $1 composition notebooks and covered them with scrap fabric.

I will post a tutorial at a later date (when my camera gets fixed, these pics are from an old camera and I wasn't sure how they would turn out)

It is very simple I measured the notebook on the fabric and pinned it:


Turn in right side out and accessorize!

I love this one with ruffles


Don't be dumb like me and sew the ruffles on after you have hemmed the edges. 
I sewed it closed and had to pick them off. 

I also love this one, I made felt flowers


I cut them out with my Sissix, which I never thought I'd use again.  But it worked great.  Then I cut the head off some colored pins I have for the centers.  (I didn't have any beads and I'm working on stash busting, no craft store trips)

They turned out great, my girls love them.  Hopefully this keeps us "talking".

Have a great week!


The Girl Creative